Insert/Hide/Move Column
Online Help > Insert/Hide/Move Column
What does the “Insert Column” functionality do?
The “Insert Column” functionality allows you to add a column to your project.
What does the “Hide Column” functionality do?
The “Hide Column” functionality allows you to hide a column in your project.
What does the “Move Column” functionality do?
The “Move Column” functionality allows you to move a column in your project.
What does the Text Wrap functionality do?
The Text Wrap functionality automatically adjusts text to fit within designated spaces, enhancing readability and preventing overflow.
What does the Best Fit functionality do?
The Best Fit functionality dynamically adjusts the width of columns based on the content within the column with the longest entry.
When I hide a column, how can I unhide it?
To insert a column, click on the Format menu – Insert Column or select Insert column from contextual menu.
How to change the width of an existing column precisely?
To change the width of an existing column precisely you must double click on the column, then change the width input by clicking the up and down arrows.
Note: You can also change the width of an existing column precisely by right clicking on the desired column header and clicking on the Best Fit button.
How do I change the relationship between tasks from the Gantt Chart?
To change the relationship between tasks from the Gantt Chart, apply the Gantt Chart View, double click on a link from the right-side chart portion of the view. In the Task Dependency dialog select the desired relationship and click OK.
How to center the name of a column?
To center the name of a column double click on the column, then click on Align Title - Center.
When I hide a column, do I erase all its data?
When you hide a column, you do not lose its data. The hide option is designed to customize the sheet view and avoid overcrowding.
How can I move a column in front of another?
To Move a column, click on the column name cell from the table header to select the entire column, hold down the column, drag it and release it in front of the column where you want to place it.
How do I update the column definition?
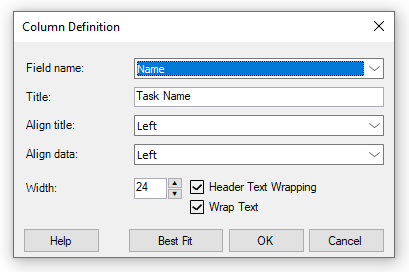
On editable views, columns can be updated by double clicking on the column header in the grid or going to menu Format – Column Definition and changing the column definition (field name, title, title and data alignment or column width).
There is a WBS numbering issue.
Please download and install the latest app from this link: Download Project Plan 365
How to adjust column width?
To quickly adjust the width of any column in order to fit the longest item in the column, double-click the right border of the column title. The column width is automatically sized to fit the widest text in any cell.
In which views is allowed to insert column?
To hide a column is allowed in a sheet view, either a task type view (i.e. Gantt Chart, Tracking Gantt or Task Sheet) or resource type view (i.e. Resource Sheet).
How do I Hide a column?
To Hide a column, select from grid the desired column, then click on menu Format – Hide Column or select Hide column from contextual menu.
In which views is allowed to Hide a column?
To hide a column is allowed in a sheet view, either a task type view (i.e. Gantt Chart, Tracking Gantt or Task Sheet) or resource type view (i.e. Resource Sheet).
Do you have a work availability field?
To see the Work column, go to Format - Insert Column - In the Field Name box select column Work and click OK. The work availability column will appear in the grid. If you want to see the working hours per day, please look at the Resource Calendar. To do this, go to menu Project-Change Working Time and select the desired calendar.
How do I wrap text in a field?
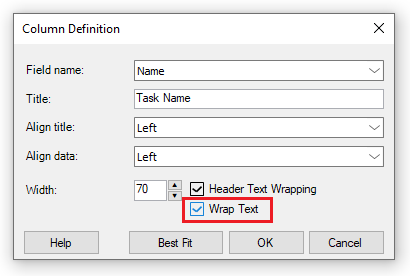
If you want the text to wrap to multiple lines if the column is too narrow to display it on one line, double click on the desired column header – from the Column Definition dialog check the Text Wrap checkbox and click OK.
Note: You can also wrap the text by right clicking on the desired column header and from the contextual menu click on the Wrap Text button.
How to flag a task?
To flag a task, you can insert a custom field of type Flag. Go to menu Format - Insert Column. Select a field from Flag1-20 insert a Title and click on the OK button.
How do I freeze column?
We are sorry, but this feature is not available at this point.
How do I see the successor?
To see the successor for a task, insert the Successors field in Gantt Chart view. Go to menu Format - Insert Column. Select the Successors field and click on the OK button.
How do I find when tasks were added?
To see when the tasks were added you can insert the Created column in Gantt Chart view.
How do I center the text?
To center the text, double click on the header of the column and in Column Definition dialog, Align Data to Center.
How do I see the overall duration of tasks including predecessors?
To see the overall duration of tasks and predecessors, in Gantt Chart view insert the Duration and Predecessors column. To achieve this, go to menu Format - Insert Column.
How do I insert the Duration Variance column?
In order to Insert the Duration Variance column, go to the Format menu and select Insert Column option. From "Field Name" select "Duration Variance" and then press OK in the dialog.
How to insert the Resource Initials field?
In order to insert the Resource Initials column, go to the Format menu - Insert Column. From "Field Name" select Resource Initials and then press "OK" in "Column Definition" dialog.
When I change the size (width) of the columns, the text and the height of the lines don't automatically adjust, so I can’t see all the text of all lines.
The height of a grid row is given by the height of the Task Name cell. If you want to make the other cells bigger you can either make the width of the Task Name cell smaller (automatically making the height bigger) or manually adjusting the height of the desired rows.
What does the “Help” button inside the “Column Definition” dialog do?
The “Help” button inside the “Column Definition” dialog redirects us to the “Insert/Hide/Move Column” article in our Online Help page.
How do I hide multiple random columns?
In order to hide multiple random columns, click on a column header, hold down the CTRL key and then click on the header of the column that you want to hide. Once they are selected, right click on a selected column and from contextual menu select “Hide Column” option.
How do I hide multiple adjacent columns?
In order to hide multiple adjacent columns, click on a column header, hold down SHIFT key and then click on the last column you want to hide. Once they are selected, right click on a selected column and from contextual menu select “Hide Column” option.
What is Column?
A column is vertical series of cells in a chart, table or spreadsheet.
How do I rename a column using the Column Definition dialog?
In order to change the title of a column, double click on the column header and inside the Column Definition dialog, type the desired name inside the "Title" field and press "OK" for the changes to take effect.
How do I insert the Resource Names column in Task Sheet view?
In order to insert the Resource Names column, select the desired view, go to the Format menu and select the "Insert Column" option. From "Field Name" select "Resource Names" and press "OK".
How I can make the text left justified?
We don't have the possibility to justify the text in our app but you can align the text. In order to do that, double click on a column header and from Align Title/Align Data, select the desired option (Left, Right, Center) and press "OK" for the changes to take effect.
How can I have a view without resources?
Does the Text Wrapping apply for all the columns in my project?
The Text Wrapping can be applied to all columns from the Column Definition dialog or contextual menu.
How can I insert multiple columns at the same time in the Project Plan 365 application?
At this moment, you cannot insert multiple columns at the same time in our application.
Can I wrap resource names on Gantt Chart?
The Wrap Text option can be applied to the Resource Names column.
Step by step on how to insert a column:
Method 1:
1. In a sheet view, select the column (field) to the right of where you want to insert the new column.
2. Go to Format menu and click Insert Column.
3. Specify the Field name, Title, Title alignment, Data alignment, and Width of the column.
4. To wrap the column heading text to the next line, select the Header Text Wrapping check box.
Method 2:
1. Right-click on a column name in the table header and selecting Insert Column option from the displayed contextual menu.
2. The newly added column will be inserted in the sheet to the left of the selected column.
Note: To quickly adjust the width of any column in a sheet view or the Gantt Chart to fit the longest item in the column, double-click the right border of the column title. The column width is automatically sized to fit the widest text in any cell.
Step by step on how to hide a column:
Method 1:
1. In a sheet view, select the column (field) to the right of where you want to insert the new column.
2. Go to Format menu and click Hide Column.
Note: When you remove a column (field) from a table, you hide that column. Hiding a column does not remove information from your project file.
Method 2:
1. Right-click on a column name in the table header and selecting Hide Column option from the displayed contextual menu.
2. The selected column will be removed.
Step by step on how to move a column:
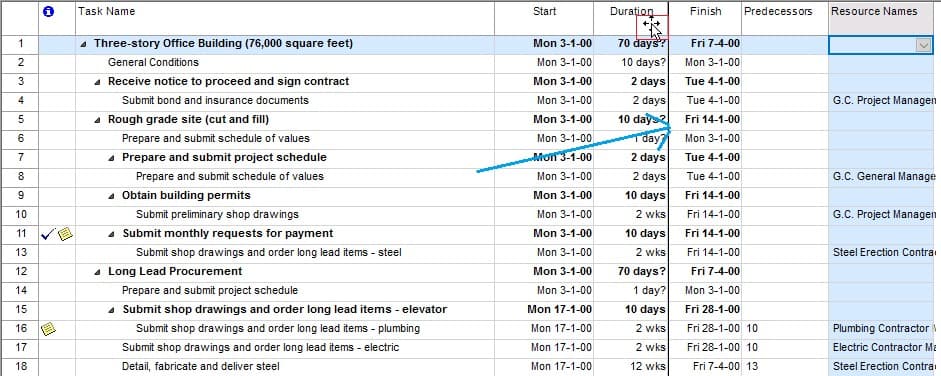
1. Click on the column name cell from the table header to select the entire column. The mouse will change its icon when is hovered over the column name from the table header.
2. Hold down the column, drag it and release it in front of the column where you want to place it. The vertical dividing line that appears as bolded (look at the blue arrow in the below print screen) indicates the position where will be placed the moved column.
Note: In case is needed, immediately after you insert, hide or move a column, you can use Undo or Redo options to go one step backward or forward relative to your recent changes.
Step by step on how to wrap the text of a column:
1. In a sheet view, select a column (field) by clicking on the header.
2. Go to menu Format – Column Settings or double click on the column header.
3. From the column definition dialog, check the Wrap Text checkbox and click OK.
Note: You can also wrap the text by right-clicking on a column header and clicking on the Wrap Text button.
| Related | Font Text Style | Bar | Currency | Language | Date Format |
| Platform | Windows | Mac | iOS | Web | Android |
| ✔ | ✔ | ✔ | ✔ | ✔ | |
| Product | Project Plan 365 | ||||
| Article ID | 112 | ||||
| Date | 9/16/2024 |


